Showing posts with label In the kitchen. Show all posts

Tuesday, September 08, 2009

Easy Bacon De-Greasing

I rely on diced bacon a lot around our house. It is an easy way to really up the flavor of any dish, even with just a slice or two. I use scissors to make the dicing of the bacon easy. Then I add those pieces to a skillet. Easy enough...but I always had a tough time getting all the grease off those little pieces.

Then I discovered this little trick that really works for me. I remove the bacon from the skillet with a slotted spoon and place it in a bowl that is lined with a double layer coffee filter. The coffee filters are very absorbent and it is easy to stir the bacon pieces around so that all the grease is absorbed.


If I'm dealing with a large amount of bacon pieces, I'll add an extra layer or two of coffee filters on top of each other. So, I'll add a third of the bacon to the bowl, then I'll top that with another double layer of coffee filters and add more bacon. It's so easy and really works great.

Plus, clean up is a breeze. I just throw the coffee filters away when I'm done and clean out the bowl. I never have to deal with those grease drips on the counter that can happen when you drain bacon on a paper towel on a plate.

Stop by We Are THAT Family for more Works For Me Wednesday.

Read more...

Wednesday, August 05, 2009

Brown Bag Burritos vs Taco Bell Beef & Bean Burritos

When my friend Amy posted her recipe for Brown Bag Burritos, I fell in love. First of all, we all love Mexican food. Secondly, could the recipe be any easier? And thirdly, it's so freezer friendly. I knew right away that I want to stock my freezer with these burritos!

My assumption that this would be a great recipe for our family dead on. These are great! And as former Taco Bell junkies, Eric and I were super excited to have another reminiscent recipe to add to our list. (The first was my homemade Taco Bell Mexican Pizzas.)

So last night when Eric asked what we were having for dinner and I told him we were having those brown bag burritos, he had a great idea. He picked up two beef and bean burritos from Taco Bell on his way home so that we could compare. Taco Bell no longer carries the regular beef and bean burritos so he got the 1/2 lb. beef combo burritos. The ingredients between the two burritos are almost identical.

Here's what we have. The Brown Bag Burrito is on the left and the 1/2 lb. beef combo burrito is on the right.

Obviously the Taco Bell burrito looks fuller. But keep in mind the length proportion between the two. (And honestly, is a 1/2 lb. burrito really necessary?)


Honestly, if this were a blind taste test, you probably wouldn't be able to tell the difference between the two. However, Eric and I both agreed that we truly preferred the brown bag burritos. We didn't feel like we were eating fake food. (Do you know what I mean? Does the ground beef from Taco Bell really seem like real meat to anyone?)

So we definitely declared the brown bag burritos the winner! I didn't do a cost analysis of the brown bag burritos, but I'm willing to bet they are much less than the Taco Bell ones.

And once again, I'm providing the same disclosure, with a few key changes, on this post that I did on our frozen pizza throwdown post - (Note - Neither Taco Bell or Amy's Finer Things had anything to do with this post. It is not a sponsored review. Just the crazy opinions of my husband and myself who were feeling a little slap happy one Tuesday night.)

Read more...

Wednesday, June 24, 2009

A Frozen Pizza Throw Down

Frozen pizza is one of those things that we do very rarely around our house. Usually when we eat pizza, it's homemade (the frugal way to go) or from a local chain (Eric's favorite option).

However, frozen pizza was a necessity a few weeks ago. Dinner turned out to be a flop and it was a date night at home for Eric and I. So I asked him to pick up something at the grocery store on his way home from work that we could have for dinner. He opted for frozen pizza.

More precisely, he opted for 2 frozen pizzas. He wanted us to do a little taste test and see what we found. So, I present our highly scientific findings.

The test subjects:

DiGiorno Rising Crust Pizza - $7.99 vs. Red Baron Classic Crust - $4.99

Our biggest question was if the DiGiorno was really worth the 3 extra dollars. Being eternally frugally optimistic, I said no way! Eric wasn't so sure.Here are the pizzas, ready to go into the oven. The DiGiorno is on the left (notice the clever little D Eric made out of the pepperoni?) and the Red Baron is on the right.

Initial impressions showed that the DiGiorno was a thicker crust with more cheese. The Red Baron had more sauce and pepperoni though.
Fresh out of the oven. There's definitely a marked difference between the two pizzas. They both looked and smelled delicious, but the DiGiorno did have a nicer look to it.
On the plate, ready to devour. Again, the DiGiorno is on the left and the Red Baron is on the right. And again, there is a marked difference between the two.

But now for the true test, because afterall, does it really matter how something looks if it doesn't taste good?

Eric definitely preferred the taste of the DiGiorno. He liked the thicker crust and all that cheese. For me, I was all about the Red Baron. I suppose this isn't the best gauge since it wasn't a blind taste test and the cost might have factored in for me. Although I really don't think so. I think I just preferred the thinner crust, more sauce and less cheese.

So our final answer is that we don't have an answer. Eric says it's worth the extra $3 and I say it's not. I guess it's just a matter of preference between what kind of crust and amount of cheese you prefer.

In the end though, you're probably better off sticking with the homemade pizza for regular pizza consumption and the take-out pizza for the occasional splurge.

Where do you stand on this pizza issue? Are you a loyal fan of DiGiorno or Red Baron...homemade or take-out?

(Note - Neither DiGiorno or Red Baron had anything to do with this post. It is not a sponsored review. Just the crazy opinions of my husband and myself who were feeling a little slap happy one Friday night.)

Stop by Hooked On Houses for more Hooked On...

Read more...

Wednesday, February 25, 2009

So Worth the $7.00

Lately, it seems like our silverware has been falling into a black hole. Well not exactly a black hole, but close enough. We've found it under couch cushions, in beds, in the toybox.

And we know a good portion of it has been slipped into the little crack between our counter top and cabinet left from when the dishwasher was installed. If we ever (God forbid!) get mice in our home, that would be the prime space for them to take up residence because they could eat like royalty with a nearly complete set of flatware at their disposal.

It has been an ongoing joke between Eric and I for awhile. But lately I've been seen the frustration in the situation more than the humor. There is no reason we should run out of forks before lunch time!

So Eric, because he loves me and gets that limiting my frustration is a good thing, stopped in at IKEA last week. There he picked up 2 boxes of "Bonus" flatware for $3.49 a piece. Each box contained 4 forks, 4 knives, 4 tablespoons, and 4 teaspoons. Perfect!Granted, this silverware is not the prettiest, but it is super functional. The kids love it. And the price was right.

Stop by The Diaper Diaries for more Things I Love Thursday and Hooked On Houses for more Hooked On....

Read more...

Wednesday, February 18, 2009

Kidney Bean Poisoning


Last week Eric was listening to Dead Heat by Dick Francis. In the book, one of the characters was poisoned using kidney beans. I had heard this mentioned before, but after Eric brought it up, I decided to do a little more research.

Apparently, raw and undercooked red kidney beans can cause a wicked case of food poisoning. As few as 3 or 4 can have you miserable for hours.

From what I read, to avoid this all dried kidney beans must be soaked for a few hours and boiled for at least 10 minutes. Because of this, it is not recommended that you cook raw kidney beans in a crock pot.

I had never heard of this before. I couldn't believe all of the hits returned when I googled "kidney bean poisoning." Why is this information not more well known?

Here are a few of the sources I read through.

Is this news to you too, or is it just me?

Read more...

Monday, January 12, 2009

Sometimes, I Like To Cut Myself A Little Slack

We eat meals made from scratch 99% of the time. Whether it's a meal that I froze earlier in the month and just pull out to reheat or something that I made in the morning to reheat at dinner time, I know it's something I put some time into making.

The biggest exception to this is grocery day. Month after month, every dinner on grocery day is taken from the freezer and shelves at the store.

Since we only shop once a month, both the shopping trip and the unloading take quite a few hours. Because I'm pretty set in my cooking habits and am used to making dinner early in the day, the thought of cooking a big dinner after grocery shopping really doesn't appeal to me. Also, usually by the time we go shopping, all of my freezer meals from the past month have been eaten. However, my family still expects to eat dinner.

So I cut myself a little slack and take some help from the store. Our go to meal is ravioli from the freezer department, a jar of spaghetti sauce, and usually a bag of frozen spinach. This dinner takes literally minutes to cook. Boil the pasta, drain and pour the sauce and spinach into the pasta pot. Heat until warm and add the pasta back in. Toss to combine and dinner's done. It's the perfect meal for this crazy busy day.

This month we switched things up a little bit and bought tortellini instead of ravioli. I forgot to add the spinach too. But it still tasted great.

Not only does this meal make our grocery day a little less hectic, it also frees up my mind while shopping and putting together plans for freezer cooking that will begin the next day. I have a much easier time shopping when I'm not dwelling on what I'm going to make for dinner that night, or when I'll find time to make it.

What is your go-to meal on really busy days like this? Also, do you lose focus in the grocery store when you're trying to plan out dinner too, or am I the only one?

Stop by Tammy's Recipes for more kitchen tips and Blessed With Grace for more Tempt My Tummy Tuesday.

And don't forget to check out some of the great posts on Blissfully Domestic's weekly round-up.

i am blissfully domestic kitchen

Read more...

Monday, January 05, 2009

Prepping The Fridge And Freezer

This week is when I tackle the monthly grocery shopping. And with that always comes the dreaded task of cleaning out the refrigerator and freezer.

That job was especially daunting this month. I didn't do a very thorough clean out last month with all the holiday busyness. Add to that extra food and goodies from Christmas and New Year's, and it was basically a disaster area.
Unfortunately, I found a lot of forgotten-about leftovers tucked away behind fudge and other goodies. A disorganized refrigerator is definitely not a frugal refrigerator!

It feels so good to have it done. Now I get to look forward to re-filling it with new groceries and hoping that I'm able to keep it organized.
As you can see, there is still quite a bit of things in the freezer. That chicken will get boiled right away so that I can make stock and shred the meat for other meals. I think once I have that out of there I'll be able to move things around enough so that I can fit plenty of freezer meals in there too. The refrigerator isn't really as full as it looks. That large pan on the top shelf is no longer there since that was our dinner.

Stop by 5MFM for more tackles and The Lazy Organizer for more Talk About Tuesday.

i am blissfully domestic kitchen
And be sure to visit Blissfully Domestic to share domestic bliss. As an added bonus, I'm thrilled that my entry from last week was highlighted over there!

Read more...

Monday, December 29, 2008

This Stuff Is Amazing!

Oh, how I love this chicken & black bean combo. I've shared the recipe before, but I'll share it again here for convenience sake.


Chicken & Black Bean Taco Filling
  • 2 T. Extra-virgin olive oil
  • 1 1/2 lb. chicken (boneless or not, whatever you have on hand)
  • 1 t. cumin
  • 1/2 t. salt
  • 1/4 t. pepper
  • 2 1/2 c. fully cooked black beans
  • 1 bag frozen corn
  • 1 large jars salsa (or 2 regular sized jars)
  • 1/2 c. water
  • 2 t. cumin
  • 1 t. chili powder
  • 1 t. salt
1. Heat olive oil in a large skillet. Season chicken with 1 t. cumin, 1/2 t. salt & 1/4 t. pepper. Add chicken to skillet. Cook for 5-8 minutes, flip, cover skillet and continue cooking until chicken is fully cooked.
2. Remove chicken from skillet. Shred meat and return to pan. Add all remaining ingredients. Bring to a boil and simmer for 5 minutes.

*This should make enough for 3 meals, depending on how much you use. It freezes perfectly in a freezer bag and thaws overnight in the refrigerator.
I pulled a bag of this combo out of the freezer on Friday night to make nachos. Unfortunately, I inadvertently bought "Scoops" instead of regular tortilla chips for our nachos. So, I decided since I had a little time, I'd have fun with the chips.

I filled 1 1/2 cookies sheets with the scoops and then added about a tablespoon of filling in each one.

Then I topped each chip with a little bit of cheese and put them in the oven just long enough for the filling to warm up and the cheese to melt.

Aren't they cute?

We really enjoyed this as an appetizer-style dinner. The kids had fun eating their "little bowls." I'm definitely going to make this again. I think they would be perfect for entertaining with a little dollop of sour cream or guacamole on top.

After our nacho feast on Friday night, I still had about 1 1/2 c. of chicken and black bean filling left. So on Sunday I decided to use the leftovers to make a chicken tortilla soup. I've done this before, but I had to switch things up a little this time.

I put the leftover filling in a saucepan and added about 4 1/2 c. chicken stock. I didn't have any tortillas on hand so I decided to add some leftover spaghetti noodles, just to bulk the soup up a bit and make it heartier for the younger kids to eat, since they still have a tough eating thin soup with a spoon.

It turned out delicious!

Last time I posted this recipe I shared a few other ideas on what to do with this mixture. You can read those here.

Visit Blessed With Grace for more Tempt My Tummy Tuesday and Tammy's Recipes for more kitchen tips.

i am blissfully domestic pie
Also, stop by Blissfully Domestic and share your domestic bliss from this week.

Read more...

Monday, December 01, 2008

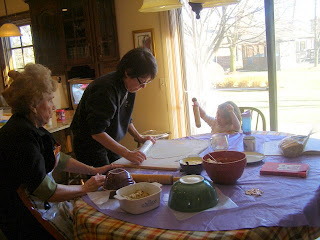
4 Generations In The Kitchen

This past Friday, I was blessed to spend quite a few hours in the kitchen with my grandmother, mom, sister, 1 daughter, and 1 of my nieces. This was something I have wanted to do for a long time.

Last year, I made pierogies for the first time. I used my grandma's recipe as my guide, but I didn't have any experienced hands to guide me. I missed that. Although they turned out very good, I still wanted to get a full-fledged initiation into pierogi making.

I got that, along with some great memories I will always cherish, on Friday.

Eric and my dad took Alex, Gracie and my nephew to Bass Pro Shop while we worked. My brother-in-law stayed home and kept an eye on the 4 remaining kiddos at home, although Olivia wandered up and joined us and my youngest niece followed her lead after awhile.

It was great working side by side with these women who mean so much to me.

My grandma sat next to me as we rolled dough and stuffed the pierogies. She had lots of great pointers, just like I knew she would.

By the end of our too short time together in the kitchen, we bagged and froze around 6 dozen pierogies. That is such a small number in comparison to what my grandpa, grandma, and mom used to accomplish together. But now I feel officially initiated into the club and I am ready to tackle the job of carrying on this tradition.
Visit 5MFM for more tackles, The Lazy Organizer for more Talk About Tuesday, and Tammy's Recipes for more Kitchen Tips.

Read more...

Tuesday, November 25, 2008

Christmas Cookie Baking, Round 1 Day 2

I am glad to say that Round 1 of Christmas baking for this year is done! Whew. It feels so good to be done.

I scaled back my plans by one batch today but I still have tons of cookies to take to my family on Thursday. At last count, there were over 26 dozen made.

Eric, the kids and I have had our fair share along the way too. I usually crave something sweet, especially with my nightly coffee. But it's funny...whenever there is a huge surplus of sweets in our house, I crave salt instead. Oh well.

All of today's cookies were more labor-intensive, so even though I made less, I was still in the kitchen for most of the day.

First up were eggnog crescents drizzled with a maple glaze.
Then chocolate-dipped shortbread fingers.

Next I made my favorites - jam thumbprints. These are very similar to my childhood favorites of traditional Polish kolacky that my grandmothers both used to make. But these are not nearly as much work.I made strawberry and apricot jam cookies. The apricot ones are my grandma's favorite, so I packed a whole bag full for her. I finished out the day with chocolate crinkles. I had to hide these almost instantly before the kiddos devoured them all.And now I'm done! At least with the cookies.

Tomorrow I'll make 2 pies, wrap presents, finish laundry, iron clothes, pack clothes, pack miscellaneous stuff, clean the house, trims the kids' hair and give them baths. Anyone notice a trend here? These things have been on my to-do list since last Thursday. I have finally become so adept at procrastinating that I managed to squeeze at least 30 hours worth of work into a 24 hour day. What an accomplishment!

Read more...

Thursday, November 20, 2008

From Thanksgiving Thursday To Freezer Friday

The abundance of food served around most tables on Thanksgiving day provides a great opportunity to creatively use up the leftovers and stock the freezer at the same time. Here are just a few ideas of things you can make to fill the freezer instead of fighting the crowds out the store on Friday after Thanksgiving.

  • Turkey Shepherd's Pie. It doesn't get much easier than this. Dice or shred about 2 cups of leftover turkey. Combine with 2 cups of gravy and any leftover vegetables. Cover with leftover mashed potatoes and freeze.
  • Basic Turkey Enchiladas. Shred about 3 cups of leftover turkey. Mix with leftover corn, optional, and 1 cup enchilada sauce. Spoon filling into corn tortillas, cover with more enchilada sauce and freeze.
  • Turkey and stuffing cups. Press leftover stuffing into the bottom and up the sides of a greased muffin tin. Combine 2 c. diced turkey with 1 c. gravy. Freeze in muffin tin until frozen, then remove cups and place in freezer bags.
  • Pumpkin pie ice cream. Dice 1 c. pumpkin pie and combine with 2-3 cups softened vanilla ice cream. Add 1 t. pumpkin pie spice. Freeze.
  • Potato patties. Use either mashed white or sweet potatoes. Combine 2 1/2 c. potatoes with 1 egg. Form into patties and cover with breadcrumbs. Brown in a skillet with 2 T. melted butter until both sides are browned. Cool and freeze.
  • Turkey stock. On Thanksgiving day, save all of your vegetable peelings and scraps. Put them in a large stockpot. Add the turkey carcass, some salt, pepper corns, and bay leaves (If necessary, you may need to crack the turkey carcass in half in order to fit it in the pot.) Fill the pot with water, bring to a boil, skim top and reduce to a slow simmer. Let simmer for at least 3 hours, although longer is better. Continue skimming the top as needed. Drain stock through a colander lined with cheesecloth or a triple layer of paper towels. Cool in refrigerate and freeze in plastic bags. Or make a turkey soup right away to eat and freeze. Or do all of the above.
Personally, I love Thanksgiving leftovers almost more than the original dinner. There are just so many fun ways to use all of that food up! What are some of your favorite Thanksgiving leftover dishes?

For more frugal Thanksgiving tips and ideas, stop by Money Saving Mom.

And if you're looking for a fun way to keep the kids occupied while you're preparing for the big day, make sure you enter my giveaway.

Read more...

Friday, November 07, 2008

Showing & Telling In My Kitchen

Amy at The Finer Things In Life tagged me to show off 7 of my favorite things about my kitchen. I love this idea! I spend a lot of time in my kitchen, so there is much I love about it. Also, I love seeing other peoples kitchens. This will be fun!

Welcome to my kitchen! It may be small, but it is definitely the heart of our home. If the size of this kitchen had to be proportionate to how much time we spend in there, how many memories we create, or how much good food we make, it would be bigger then our whole house. But as it is, it's just exactly the perfect size for our lives at the moment.

Now, let me show you around a bit more.
Eric and I both spend a lot of time standing right at this counter using the laptop. I love having it right there for looking up recipes (or reading blogs, leaving comments, playing on twitter, etc.) and because it means I get to spend more time with Eric while he is doing things for work. The laptop also makes a great picture frame substitute.
Right next to that section of counter space is our sink. I love my view from the sink. On those rare occasions when the kids aren't in the kitchen with me, I can still see them and interact with them. Someday I'll have a kitchen sink with a window above it, but until then, I'll enjoy the landscape of my children.This is the spot in the kitchen where I do most of my cooking. Do you see that Starry Night picture back there? That is actually a cutting board and I just love it! Beauty and functionality all rolled into one - what could be better?
My Kitchen-Aid mixer. 'Nuff said! If I thought it would appreciate them, I think I'd buy it flowers every month.
This is my K.C.C. - Kitchen Control Center. I keep most of my cookbooks on the counter here (or in my baking cabinet just above the microwave). On top of the microwave is where I keep important household papers that I need to do something with. I always keep our calendar there so that I can keep track of our family activities as well as manage Eric's work schedule.
This is a new favorite. The top of my refrigerator. It is actually clean! It hasn't been clutter-free in months, but Eric surprised me by taking care of it a few days ago. Didn't he do a great job? Now the trick will be actually keeping that way. Once December rolls around, I have a few special Christmas decorations that I put up there, so I don't have to long to maintain it's cleanliness.I love the fact that we have a pantry, and I especially love this shelf in my pantry. It always brings a smile to my face.

Okay, so there you have it - 7 things I love about my kitchen. And now for one bonus thing I love:
Back in May we painted our kitchen in anticipation of selling our house. (It used to be a pale greenish shade.) We still have some touch-up and clean-up work to finish. However, I am in no hurry to clean up this paint splatter. Do you see the guy there? This is on the cabinet right next to our stove and that guy and I have many deep conversations while I stir spaghetti sauce or flip pancakes. He's my buddy!

Next, I'd like to see the 7 favorite things in these kitchens:

  1. Simply Mangerchine
  2. Extreme Housewifing
  3. A Homemaker's Journal
  4. My Blessed Life
  5. $5 Dinners
  6. Small Town Blessings
  7. Delighted Mom
And find more Talk About Tuesday over at Lara's blog.

Read more...

Monday, November 03, 2008

Ideas For Using Up All That Halloween Candy

Is your home overflowing with lots of little candy bars and sugary goodness right now? If you're anything like me, having all of those little goodies around makes it too hard to resist eating just a few, or a dozen. So why not save some money and calories by putting that candy to good use in other ways?

Here are just a few ideas:

  1. Little Hershey bars can be melted for fondue, chopped for chocolate chip cookies (freeze the dough for a time when all of the other treats are gone), or shaved to decorate other baked treats.
  2. Many of the chocolate candies can be chopped and stored in individual baggies for topping ice cream, in homemade blizzard-type drinks, or for parfaits or other desserts. If you store all of the chopped candies in freezer bags, it will stay good for a long time.
  3. Pick some of your favorites and hide them in the back of the freezer. Snickers, 3 Musketeers, and Milky Ways were some of our freezer favorites when I was a kid. My dad always claimed his portion of 3 Musketeers for the freezer right away.
  4. Freeze some of the gummy-type candies to use for Christmas cookie/gingerbread house decorations.
  5. Do a quick search for recipes to use up some of your candy. There are tons of ideas out there. Here's one to get you started.
Championship Cookies
  • 2/3 c. butter or margarine
  • 1 1/4 c. packed brown sugar
  • 1 egg
  • 1 t. vanilla
  • 1 1/2 c. flour
  • 1 t. baking powder
  • 1 t. baking soda
  • 1/2 t. cinnamon
  • 1/4 t. salt
  • 8 miniature Snickers bars, or 3 regular sized bars
  • 1/2 c. quick-cooking oats
1. In a mixing bowl, cream butter or margarine with brown sugar. Stir in egg and vanilla.
2. In a separate bowl, stir together flour, baking powder, baking soda, cinnamon and salt. Slowly add to the mixing bowl, until all combined. By hand, stir in the Snickers and oats.
3. Drop by tablespoon onto a greased or lined cookie sheet and bake at 350 degrees for 10-12 minutes, or until lightly browned. Cool on wire racks.

**This dough freezes just fine and the cookies can be baked without thawing the dough first.

Tammy's Recipes has lots more kitchen tips.

There are more frugal tips at Tightwad Tuesday.

Also, don't forget to stop in at Blessed With Grace for more recipes to tempt your tummy.

Read more...

Monday, October 27, 2008

Versatile & Strechy Chicken Taco Filling

One of my favorite things to have on hand in the freezer are meat/sauce/veggie mixes that can be used in many different ways. I often rely on a ground beef/tomato sauce/veggie mix for all of my Italian dishes, as well as chilis and sometimes even tacos. I use a similar mixture for a sloppy joe mix that I use in many different meals. And chicken/gravy/veggies is always a standby for soups, casseroles, pot pies, chicken and dumplings, etc.

My new favorite multi-purpose mixture is a stretchy chicken taco filling. We have been eating this as traditional tacos for a long time. But over the past few months I have been playing around with it more and finding lots of other ways to use it.
It makes delicious quesadillas. This is our favorite way to use any leftovers we have after having it as tacos one night. We all like it so much I think I should use this in regular rotation and not just for leftovers.

I used it as the meat layer in a Mexican tortilla lasagna a few weeks ago. It was such a delicious and filling dinner.

Some other things I've done with it:

  • Served over rice with shredded cheese on top
  • Mexican pizza topping
  • Mexican French bread pizzas (So good!!)
  • With scrambled eggs for breakfast burritos
  • Nacho topping
  • Taco salad
  • Thinned with 1 can tomato sauce and 1 1/2 c. chicken stock, plus some extra spices and tortilla strips for a chicken tortilla soup
Next on the list - Southwestern eggrolls! I was planning on making these this past weekend. However, when I pulled out the wrappers they were moldy. So I improvised and we just had it over rice.

My plan for the Southwestern eggrolls is to heat the filling to a slow boil and let is simmer for a little bit so that it thickens up a little bit. Then, I'll use the filling in egg roll wrappers and fry them. I can tell from the taste of the filling that it will be a very similar taste to the Southwestern eggrolls you find in restaurants. I'll let you know how they turn out once I finally make them.

Chicken & Black Bean Taco Filling
  • 2 T. Extra-virgin olive oil
  • 1 1/2 lb. chicken (boneless or not, whatever you have on hand)
  • 1 t. cumin
  • 1/2 t. salt
  • 1/4 t. pepper
  • 2 1/2 c. fully cooked black beans
  • 1 bag frozen corn
  • 1 large jars salsa (or 2 regular sized jars)
  • 1/2 c. water
  • 2 t. cumin
  • 1 t. chili powder
  • 1 t. salt
1. Heat olive oil in a large skillet. Season chicken with 1 t. cumin, 1/2 t. salt & 1/4 t. pepper. Add chicken to skillet. Cook for 5-8 minutes, flip, cover skillet and continue cooking until chicken is fully cooked.
2. Remove chicken from skillet. Shred meat and return to pan. Add all remaining ingredients. Bring to a boil and simmer for 5 minutes.

*This should make enough for 3 meals, depending on how much you use. It freezes perfectly in a freezer bag and thaws overnight in the refrigerator.

For more Kitchen Tips, go here; more Tightwad Tuesday, go here, and more Tempt My Tummy Tuesday go here.

Read more...

Thursday, October 23, 2008

Banana Raisin Bread

I had planned on making a yummy, yeasty cinnamon-raisin bread this week. But I had some bananas that were starting to head South pretty quickly just staring at me from their perch on the counter. Sure, I could have put them in the freezer but I wanted to use them. Any baked good with bananas was really sounding good to me. So, I did a quick google search and found a banana raisin bread recipe on the Sun-Maid Raisin site.

It looked great, so I figured I'd give it a shot. I made the mandatory changes - I really cannot make a recipe exactly as it states, I always have to mix up a few things here or there to give it my own flavor and cater to my family's specific tastes. I know I'm not alone in this, right?

Banana Raisin Bread

  • 1/3 cup butter or margarine, melted
  • 2/3 cup granulated sugar
  • 2 large eggs
  • 1 teaspoon vanilla
  • 1 cup (2 medium) mashed ripe bananas
  • 3 tablespoons milk
  • 1 cup all-purpose flour
  • 1 cup whole wheat flour
  • 1 teaspoon baking powder
  • 1 teaspoon cinnamon
  • 1/2 teaspoon baking soda
  • 1/4 teaspoon salt
  • 1/2 cup raisins
1. Cream the butter and sugar together for 5 minutes. Add eggs and vanilla, mix well. Add bananas and milk, mix well.
2. In a separate bowl, combine the flours, baking powder, cinnamon, baking soda and salt. Slowly stir the flour mixture into the banana mixture. Stir in the raisins.
3. Bake in a greased loaf pan at 350 degrees for 55 to 60 minutes.

I really liked the texture of this bread. It is dense and holds up well to toasting. It also makes some mean French toast. I'm definitely going to do a double batch next time. I might even try going to all whole wheat flour.

Head over to Grocery Cart Challenge for the recipe swap.

Read more...

Tuesday, October 14, 2008

Preparing For Christmas Baking Season


One of my favorite Christmas traditions is doing all kinds of special things in the kitchen. Every year I typically make at least 8 different varieties of cookies, candies, fudge, and caramel & chocolate covered pretzels. Last year, I also added homemade pierogi to that rotation. I also baked 20 dozen cookies in 1 1/2 days last year for a client of Eric's who had requested them. And every year I regret that I didn't get started sooner.

My eyes and stomach also seem to be bigger than what I know is reality. So I plan for about 20 varieties of cookies. Yet every year, I run out of time to get to all of them. And invariably, some of the ones I don't get to are some of our favorites. (Since they are all our favorites, this probably isn't a fair statement, but it is still disappointing.)

So this year I am vowing that it will be different. There are so many varieties of cookie dough that can be frozen ahead of time. I have already created my list and I plan on starting next week. My goal is to get at least 1 or 2 doughs in the freezer per week. (A chest freezer would certainly help this year. I might have to ask a neighbor if I could borrow some freezer space.) I have already marked which cookie doughs can be frozen ahead of time. Also, we will be going to my family's for Thanksgiving and not seeing them at Christmas. I would still like to be able to give them their boxes of cookies though. An early start is definitely a necessity this year.

Here is my list so far. I'm sure it will change many times between now and Christmas, especially as I come across new recipes. (With all the wonderful recipes I have been finding on blogs lately, I wouldn't be surprised if only a few absolute favorites stay on the list.) The doughs that can be frozen are marked with an (F).

  1. Kolacky (F)
  2. Maple Pecan cookies
  3. Almond Spritz cookies (F)
  4. Candy Cane cookies (F)
  5. Melting Moments (F)
  6. Santa's Whiskers (F)
  7. Chocolate Pecan Logs (F)
  8. Peanut Butter cookies w/ Hershey's kisses (F)
  9. Mexican Wedding Balls (F)
  10. Pizelles
  11. Snickerdoodles (F)
  12. Sugar cookie cut outs (F)
  13. Gingerbread (F)
  14. Eggnog Crescents (F)
  15. Peppermint Snowballs (F)
  16. Honey & Poppy Seed Hearts (F)
  17. Chocolate Reindeer (F)
  18. Maple Log Cabins (F)
  19. Eggnog Thumbprints (F)
  20. Orange Chocolate Rounds (F)
I will post the recipes for each cookie as it gets crossed off the list. If you see one that you'd like the recipe for, please just let me know and I'll get it posted as soon as possible.

Most cookie doughs can be frozen. Generally, if the dough is supposed to be chilled before handling, I know without a doubt that it can be frozen. Otherwise, as long as the dough is firm, I assume it will be fine in the freezer. I haven't encountered any problems with this method.

I thought about making the cookies ahead of time and freezing them. First of all, they will take up too much room in my freezer. And secondly, nothing gets me in the Christmas spirit like the smell of cookies baking. I don't want to lose that feeling.

I'm kind of excited to have this long-thought of plan in place for this year. I am really sure that it will work for me.

To find more Works For Me Wednesday, head over to Rocks In My Dryer.

Read more...

Monday, October 13, 2008

Stretching Pie Crust

For most of my cooking years, I have been hesitant to make homemade pie crust. I figured I would never be able to roll it out perfectly and that it would be a long and messy process. A few months ago, I finally made my first attempt. I was surprised how easy it was, but was disappointed in the taste.

Last week, with a bushel of apples that were just being begged to be turned into a pie, I decided to try again. I worked a little closer to home for my recipe (Happy To Be At Home, to be exact). I also followed Toni's advice and put my flour and butter in the freezer for a few hours before making the crust.

I was quickly surrounded by three eager helpers when I began to assemble everything. I wanted a way to get everyone involved, so I decided we would use cookie cutters to out the crust for the tops of both the apple pie and the chicken pot pie I was making for dinner.

Alex helped with the rolling.
Isabelle was responsible for cutting out the leaf shapes and placing them on top of both pies.Olivia put all of the cut apples into the bowl and stirred together the pie filling.

I doubled the original recipe, which was more than enough for both pies. As you can see in Isabelle's picture, we made the chicken pot pie in a 13x9 pan. I initially wasn't sure if I'd have enough crust to do this, but I figured I could just make more if absolutely necessary.

However, by using the cut-outs to top the pies, we had plenty of dough for both, as well as extra to put in the freezer. We all loved the way the pies looked also. They were so festive and seasonally appropriate.
The taste was not affected at all with this method. We all agreed we weren't lacking in any pie crust goodness. I think this will be my go-to pie crust method from now on. It's easy, tastes great, and really stretches the amount of pie crust used.

You can find more Kitchen Tips at Tammy's Recipes.

You can find more Tightwad Tuesday at Mary's blog.

Read more...

A Grammatical Disclaimer

I freely admit to consistently using improper grammar in the following areas:
1. I like run-on sentences.
2. I have a tendency to end sentences with a pronoun. (I really do. I can't help it.)
3. I always seem to use passive voice in my sentences. (See?)

I've been trying to break this habit, unsuccessfully, for years, so now I just accept that as my writing style, and since I'm not writing for grades anymore, I embrace it. (Again, see?)

Hence, I invoke Blogger Artistic License for this blog!

Copyright 2008. A Simple Walk. All Rights Reserved.

  © Blogger template The Professional Template by Ourblogtemplates.com 2008

Back to TOP